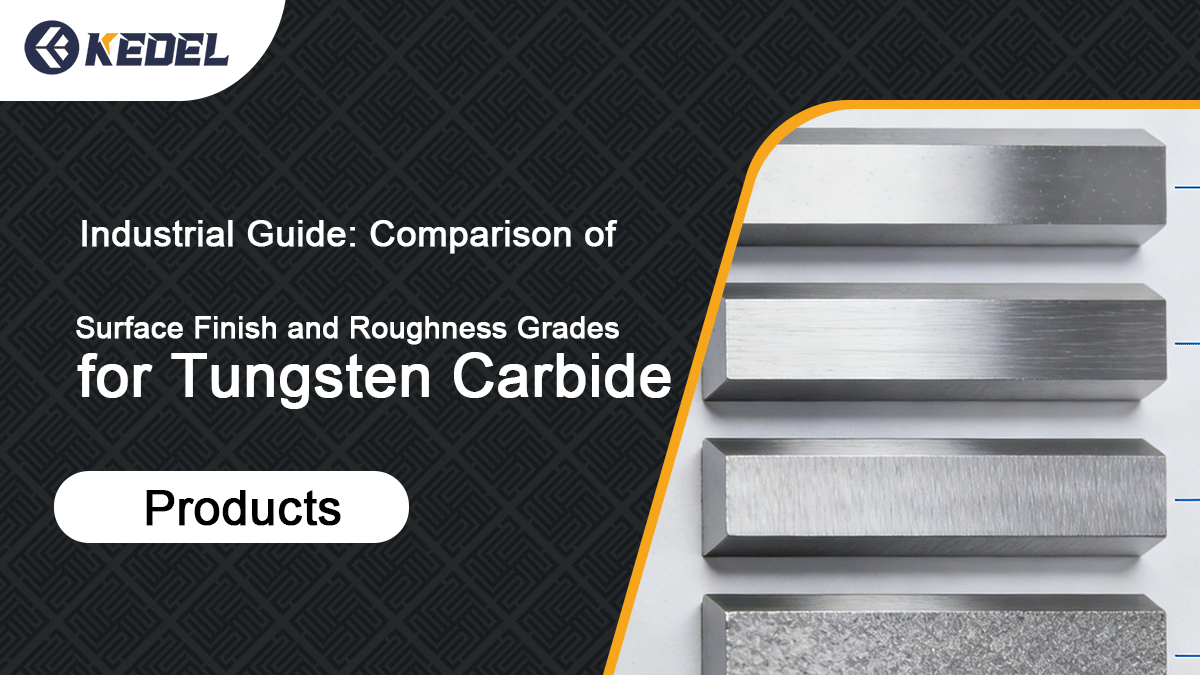
In the production and procurement of tungsten carbide (cemented carbide) products, surface quality is an indispensable core technical indicator. The "surface finish" or "surface roughness" we often refer to directly affects the wear resistance, sealing performance, fatigue strength of parts, as well as the fitting accuracy with other components.
Since tungsten carbide is a high-hardness material, surface textures produced by different processing technologies (such as as-sintered surface, rough grinding, precision grinding, polishing) vary significantly. Combining practical experience, this article clarifies the visual effects, processing methods and application scenarios corresponding to different levels of surface roughness values ($R_a$), helping you accurately describe requirements when customizing products and avoid unnecessary processing costs.

I. First, Understand: The Standard Difference Between Surface Finish and Roughness
In international trade or technical communication, customers from different regions may use different terms. The following table makes it clear at a glance:
| Term | Applicable Standards/Regions | Core Definition | Common Evaluation Parameters | Significance of Values |
|---|---|---|---|---|
| Surface Roughness | International (ISO), American (ASME), Chinese (GB) mainstream standards | Measures the unevenness (small spacing, tiny undulations) of micro peaks and valleys on the processed surface | $R_a$ (Arithmetical Mean Deviation of Profile), unit: $\mu m$ | The smaller the value, the smoother the surface |
| Surface Finish | Early Chinese standards, old standards of some European countries | Early expression for measuring surface smoothness | Symbol $\nabla$ (grade classification) | The higher the grade, the smoother the surface |
A supplementary note: Currently, China's national standard has uniformly adopted "roughness", but in factory production sites and old drawings, many senior technicians are still used to communicating with "surface finish grades". There's no need to worry when encountering this situation; just correspond to the grade conversion in the following table.
II. Core Parameter Comparison Table for Common Roughness Grades of Tungsten Carbide Products
This is the most commonly used core data in our industry, integrating $R_a$ values, old standard grades, surface characteristics, processing methods and application scenarios. You can directly refer to it when purchasing or placing orders:
| Roughness $R_a$ ($\mu m$) | Early Chinese Standard Grade | Surface Visual + Tactile Characteristics | Common Processing Methods | Typical Application Scenarios |
|---|---|---|---|---|
| 12.5 | $\nabla 3$ | Obvious processing tool marks, rough granular feel to the touch | Rough turning, as-sintered blank surface | Non-fitting counterweights, basic spacers |
| 3.2 | $\nabla 5$ | Slight processing traces visible, basic metallic luster | Ordinary grinding | Non-critical mounting surfaces of mechanical parts |
| 1.6 | $\nabla 6$ | No processing traces visible, flat surface | Semi-precision grinding | Mold cavities and bushings with general requirements |
| 0.8 | $\nabla 7$ | Flat surface with weak reflective light | Precision grinding | Cutting edges of tungsten carbide cutting tools, locating pins |
| 0.4 | $\nabla 8$ | Clear reflective light, completely smooth and unobstructed to the touch | Fine grinding, lapping | Precision valve seats, high-precision measuring tools |
| 0.1 | $\nabla 10$ | Complete mirror effect, capable of clearly reflecting human figures | Polishing, ultra-precision processing | Sealing rings, high-precision alloy balls, wire drawing dies |
III. Why Is Choosing the Right Surface Grade Crucial? (Dual Dimensions of Function and Cost)
Many novices think "the smoother the surface, the better", but in fact, it is necessary to make a comprehensive choice based on functional requirements and costs. There are 3 main core impacts:
1. Impact on Friction and Wear Resistance
- Excessively rough surface ($R_a > 3.2$): During high-pressure sliding friction, the micro peaks and valleys on the surface will quickly wear the mating parts;
- Moderately textured surface ($R_a \approx 0.8$): In certain working conditions requiring lubricating oil storage, it is easier to form an oil film than a completely mirror surface, avoiding dry friction and thus improving wear resistance.
2. Impact on Sealing Performance
For tungsten carbide sealing products (valve seats, sealing rings, etc.), surface roughness directly determines the sealing level. Specific requirements are as follows:
- Hydraulic sealing: Requires $R_a \leq 0.4 \mu m$;
- Gas sealing: Higher requirements, usually requiring a mirror grade of $R_a = 0.1$ or $0.05 \mu m$ to prevent extremely small gas molecules from leaking through texture gaps.
3. Reminder on Processing Cost Premium
⚠️ Important Note: Tungsten carbide has extremely high hardness, resulting in high processing difficulty and cost.
Upgrading from $R_a 0.8$ to $R_a 0.1$ usually requires adding multiple polishing processes, doubling the processing time, which also means a significant increase in product unit price. Therefore, there is no need to blindly pursue high surface finish for non-critical parts; choosing on demand is the most cost-effective.
IV. 2 Common Detection Methods for Surface Roughness (On-site + Precision)
During actual acceptance, select the corresponding detection method according to the precision requirements. The specific differences are as follows:
| Detection Method | Applicable Scenarios | Operation Method | Advantages | Limitations |
|---|---|---|---|---|
| Comparative Sample Block Method | On-site rapid acceptance in workshops | Visual observation + tactile perception, comparing workpieces with standard sample blocks | Simple operation, high efficiency, no need for professional equipment | Rough precision, can only judge the grade range, unable to quantify values |
| Roughness Tester Measurement Method | Acceptance of precision parts, international trade docking | Diamond stylus slides on the surface, and the electronic instrument automatically calculates and displays the specific $R_a$ value | Quantitative precision, internationally recognized standard method | Requires professional equipment and operators, lower detection efficiency than the sample block method |
V. 3 Practical Suggestions for International Procurement
When communicating with global suppliers, it is recommended that you:
- Clearly mark the $R_a$ value: Avoid vague terms such as "polished" or "smooth" as much as possible. Providing a specific $R_a$ range (e.g., $R_a < 0.4 \mu m$) is more in line with international professional habits;
- Distinguish between critical and non-critical surfaces: Clearly mark on the drawings which parts require high-precision polishing and which parts can retain the as-sintered surface;
- Consider post-processing allowance: The natural roughness of tungsten carbide products after sintering is usually between $R_a 1.6 - 3.2$. If a higher grade is required, sufficient processing allowance must be reserved during drawing design.
Summary
Understanding the surface grades of tungsten carbide products can not only improve your professionalism in technical communication but also directly optimize product performance and cost. From the rough as-sintered surface of $R_a 12.5$ to the mirror surface of $R_a 0.1$, each grade upgrade represents more precise processing technology and longer service life, but at the same time, the cost will also increase.
Core Principle: Choose on demand, do not blindly pursue high grades.

